
Saturday, February 21, 2009
21 Little Hats
These 21 hats were made by the ladies of our local Prayer Shawls ministry. They will be going to the NICU at one of our local hospitals tomorrow. My son and I washed them this morning. When I asked him what they were, he said "Sick babies hats." I feel so accomplished that we have made so many hats. I hope they are a great comfort to the babies and their parents.

Tuesday, February 17, 2009
My Miracle Son
Every baby is a miracle, but my son is especially so. Let me explain...
When my husband and I finally decided to start a family we got pregnant right away. Almost immediately I started having problems. My doctor diagnosed the pregnancy as ectopic or tubal. The clinic did a sonogram and the radiologist saw the pregnancy in my tube. I was sent directly to the hospital where their radiologist confirmed the diagnosis. The hospital staff kept me overnight for observation. In the morning my OB decided to do surgery to remove the pregnancy. I was inconsolable. I insisted on delaying the surgery for a few minutes so that I could contact my support network and ask for their prayers. This was my first time as a patient in the hospital since I was born! I was terrified. When I woke up from the surgery, I asked how it went. The nurses told me that my OB had not found an ectopic pregnancy. I asked if I was still pregnant and they told me to ask my OB for more info. Well, I just start to laugh. I was pregnant and God had a plan for this baby! My OB cautiously warned me that I may miscarry due to the drugs and trauma of the surgery. They monitored my hormonal levels every other day for a week. At the end of the week, they did a sonogram and saw the pregnancy safely in my uterus.
Fast forward to 12 weeks into the pregnancy. I went for my first prenatal visit with the OB. She told me that we should be able to hear the baby's heart beat. Well, we couldn't. We scheduled another sonogram and thankfully, there was a heart beat. Things seemed to be normal until the next visit. I normally have great blood pressure readings, but at this visit my blood pressure was elevated. OB decided I need to do a 24 hour urine collection. Unfortunately I was about 16 weeks pregnant and it was my 4 year wedding anniversary! Can you imagine? I lugged a cooler full of urine with me every where we went during our celebrating. The urine test was normal, but my blood pressure remained elevated. It got higher and higher as the baby grew and I developed liver pain.
At my 38 week visit my OB decided that they baby needed to come now. I entered the hospital under observation for preeclampsia. After 2 hours of observation my blood pressure did not return to normal. At 10:30 on Thurs. Dec. 20 my OB started to ripen my cervix. The baby had not dropped, my cervix was not effaced or dilated. Yikes! After a sleepless night, they started me on pitocin at about 10 am on the 21st. I was so upset. I wanted to go into naturally. I wanted to labor in the comfort of my own house until I had to go to the hospital. I wanted a peaceful, drug-free, minimal medical intervention birth. That was not happening! At about 12:30 pm, the resident broke my water and labor became very intense. After about 2 hours of labor I consented to an epidural. I felt like a failure giving in. The hospital staff encouraged it with the hope that it might reduce my blood pressure. I was so glad I had it though! It relaxed me so much I was able to nap after a sleepless night. Labor was a long process since I wasn't allowed to move off the bed. At about 10:00 that night I developed an infection and had to be put on IV antibiotics. Unfortunately, I'm allergic to penicillin, erythromycin, and sulfa, so the Dr's invested some thought into an antibiotic choice that was safe for both of us. At 11:30, I was allowed to start pushing. Wow, did I push. I pushed and pushed for about 2 1/2 hours. I developed 3 tares, one of them a 3rd degree. I was exhausted, but the doctors warned that if I didn't endure they would need to use forceps, or worse, a c-section. Finally, at 1:36 am on the 23rd (yes, that's 27 hours after the process started) my son was born. But that wasn't the end of the problems.
Unfortunately, I can only make half the amount of milk that a baby needs - even with the help of fenugreek and regularin. I did not know this. I had received counsel to not supplement with formula or water, that my milk would come in eventually. Well, after about 5 days, we were suspicious that our son was not receiving enough food. At his first pediatric appointment, his doctor diagnosed him as severly dehydrated. We spent the next 4 days in the hospital while his blood chemistry returned to normal. I also had to learn to supplement my own milk with formula through various techniques.
He had a rough start, but my little blessing is a normal, healthy, 2-year-old boy now. He's our Christmas present from God that we got to open 2 days early.

Sunday, February 8, 2009
Customs List and Status

Nov 2009 - Limit 3
2) natalee_ava
3) Ajna - one down, one to go
Dec 2009 - Limit 3
1) Mommyz
2) green.mommy
3) clothlovinmamaof2
Jan 2010 - Limit 2
1) gooseymama
2) bright_eyes_mama on CDN
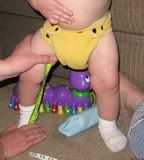
How to Measure for Woolies
Accurate measurements will ensure a good fit for your child.
1) Waist: measure at your child's natural waist.
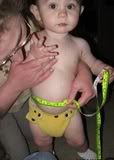
2) Rise: Put the 0 end of the tap measure at baby's belly button. Thread the tape measure between his/her legs and up above the top of the diaper.

3) Hips: Wrap the tape measure over the widest part of the diaper booty in the back and the widest part of the hips side to side.
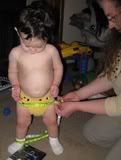
4) Thigh: Wrap the tap measure around the thickest part of baby's thigh.
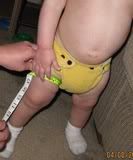
5) Inseam: Measure from the bottom of the diaper to the floor for longies. Bottom of diaper to knee for shorties (or to desired length). Baby should have a straight leg, model was not being cooperative.

Carver Creations Policies
1) I don't require a deposit to hold your spot. Please notify me if you wish to relinquish your custom spot. When it is your turn on my waiting list I will contact you to finalize all details. Please let me know before hand if you will be out of communication for a few days so that I may make appropriate adjustments to my customs list. If we have not made previous arrangements and you are unable to respond within 7 business days I will move to the next customer that is waiting.
2) To ensure a proper fit I have instructions on how to measure your child for wool. You may view my tutorial here "How to Measure for Woolies."
3) Please see my care instructions "How to keep your hand-dyed wool looking it's best". Wool will felt with normal use. Some babies are sensitive to certain types of wool yarn. Wool can experience compression wicking. Some dyes will bleed into the wash water so please wash each wool item separately. The colors of wool, like all fibers, tend to fade with use.
4) I wash and lanolize woolies prior to shipping them.
5) Please let me know how the item fits and functions when you receive it. I enjoy hearing positive input. I also appreciate constructive criticism because it allows me to improve my craft. All returns are made at the discretion of the seller.
6) I usually ship orders within 2-3 days after your order is completed and payment is received. All instock items are shipped within 48 hours. My postage paid prices are for customers in the U.S. Canadian buyers please add $1. If you do not pay within 30 days, then I will sell your item. I do recommend the purchase of postal insurance on all orders. If you choose not to purchase postal insurance, I will not be responsible for lost, stolen, or damaged packages. NO REFUNDS OR REPLACEMENTS will be issued for uninsured orders.
7) I ask for payment when I'm done creating. I can accept both funded and credit card (please cover fees) Paypal and Revolution Money Exchange.
8) For yymh/yymn spots: I encourage you to research yarn types and dyers before purchasing yarn. You are welcome to have the yarn seller ship it directly to me. If you are not sure that you will like the yarn, I recommend that the seller ship it to you first. I will return leftover yarn weighing 0.5 ounce or more. Yarn amounts under 0.5 ounce, I will keep. Please purchase the recommended amount and weight/type. The weight (bulky, sport, worsted) of the yarn will determine how much I need for a given item.
Saturday, February 7, 2009
What's the difference between knit and crochet?
Here's an exmaple of knit shorties 
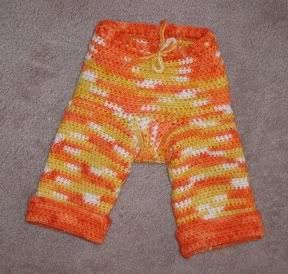
This one is crochet 
Beyond the difference in appearance, crochet and knit have many functional differences. Crocheted items are thicker than knit, making them more leak-proof. Knit is thinner, making it more hot weather friendly. The thickness of crochet makes it more durable in the long run. Knit starts to look thin after multiple shavings. Knit stretches mostly width-wise while crochet stretches more length-wise. Crochet uses more yarn to complete the same size project. The actual stitches of crochet are generally larger with larger spaces between stitches than knit. Knit stitches are smaller and closer together. Knitting can be done by machine, but crochet must be hand made. For crochet woolies, I would recommend something done in single crochet, half double crochet, or Tunisian crochet. For knitted longies, I would recommended something with 4 or more stitches per inch.
Wednesday, February 4, 2009
How to Take Good Care of Your Woolies
My personal preference:
I like Buddha Bunz wool wash. Turn your woolies inside out, that way if you overlanolize, the lanolin spots won't show up when your child wears the wool. First I rinse the wool by filling the bathroom sink with cool water and gently squishing the wool in the water. I put about a nickle size blob of wool wash in the bottom of a large bowl. I add just enough warm water to cover the bottom of the bowl. Then I swish the water to create a small lather. Next I fill the bowl with cool water. I put the woolie in the bowl and squish it around until I feel that it's clean. Then I let it soak for about 30 min. I pour the wash water and wool into the washing machine and use the spin cycle to remove the excess water (take care to ensure that your washing machine is set to no hot water or agitation). Then I lay the wool over a collapsible drying rack. It usually takes about 24 hours to dry. I like Buddha Bunz wool wash because it has enough lanolin in it that I don't have to lanolize. Melinda also offers a lanolin spray if you need just a little lanolin boost between washings. http://hyenacart.com/prod_details.php?id=54056&vid=1379
Baby shampoo and lansinoh method:
Always use room temperature water when washing and rinsing wool. Be gentle with them as you hand wash, too much friction and heat on the fibers will cause them to felt. Turn the wool inside out before washing. Rinse the wool by hand in cool water. Add wool wash or baby shampoo to new room temperature water. Squish and squeeze water into the wool instead of rubbing. Rinse the wool with cool water if you are using baby shampoo. Roll them in a towel to absorb excess moisture and lay flat to air dry. Wool does not need to be washed after every use, only when it smells dirty. You can spot clean with a wool wash bar. When the wool begins to loose its waterproof quality it will need to be lanolized. After the washing process, take a small Tupperware container. Fill it half way with hot water. Put in a tiny amount of wool wash or baby soap and about ½ inch of lanolin (I use the breast cream). Put the lid on the Tupperware and shake until the lanolin has dissolved. Pour this into your sink. Add warm water gradually turning to cold water until the water feels cool. Put the wool into this water and allow it to soak for 10-15 min. Rinse the wool with lukewarm water when soak is over. Lay flat to dry.

Monday, February 2, 2009
How to keep your hand-dyed wool looking it's best
Hand-dyed yarns tend to fade over time. It's a bummer, but it's true. Here's a few tips to help reduce the fading.
1) Don't leave your woolies laying out in the sun. That means don't dry them on a line, leave them on the floor in the sun, store them in a clear container... Don't take this to the extreme. Do let your little one play in them outside.
2) Use unscented wool wash to clean them. The essential oils used to fragrance wool wash encourages the dye to fade and bleed.
3) Don't let your woolies soak in wool wash for extended periods of time. When you wash your woolies let them sit for about 15-20 min. If you let them soak for more than 30 min., the dye will start to bleed into the water.
4) If the dye in the yarn begins to bleed into the water when you wash your woolies, reset the dye.
Hopefully you can learn from my mistakes. Here's one of the first longies that I made when they were brand new:
And here's the same pair after 15 months of love and abuse:

1) Don't leave your woolies laying out in the sun. That means don't dry them on a line, leave them on the floor in the sun, store them in a clear container... Don't take this to the extreme. Do let your little one play in them outside.
2) Use unscented wool wash to clean them. The essential oils used to fragrance wool wash encourages the dye to fade and bleed.
3) Don't let your woolies soak in wool wash for extended periods of time. When you wash your woolies let them sit for about 15-20 min. If you let them soak for more than 30 min., the dye will start to bleed into the water.
4) If the dye in the yarn begins to bleed into the water when you wash your woolies, reset the dye.
Hopefully you can learn from my mistakes. Here's one of the first longies that I made when they were brand new:

And here's the same pair after 15 months of love and abuse:

Sunday, February 1, 2009
My Amazing Son
My son is now 2 years, 1 month, 1 week, and 2 days old. He learns new information, especially words so fast! I know all the data about toddlers brains are wired for language acquisition, but I'm just so amazed to see it in action. He learns faster than me and he's only two years old.

Here he is helping me dye some corridale yarn for a wool soaker.

Here he is helping me dye some corridale yarn for a wool soaker.
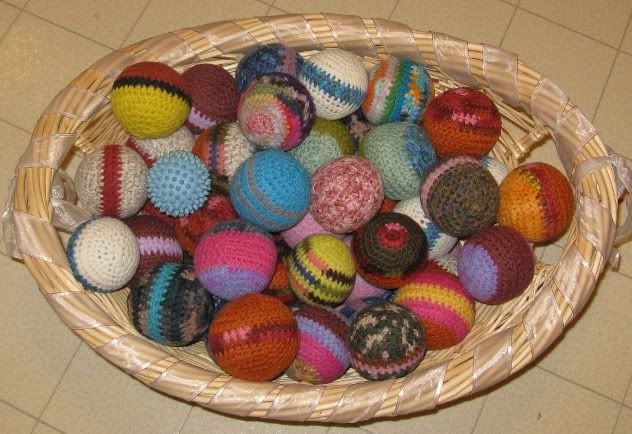
Crochet Pattern for Felted Wool Balls
I created this pattern for our Prayer Shawls Ministry. We make balls out of acrylic yarn and stuff them with fiberfill for the kiddos in the pediatric ward at the hospital.
Great for playing. Great for dryer balls. I’d recommend using an un-dyed yarn for dryer balls to prevent the dye from bleeding on your clothes.
Materials
G-hook
Worsted-Weight Wool Yarn (not super wash)
Wool yarn scraps or clippings
Row 1 Chain 2. Work 6 single crochets in the 1st chain. Join with a slip stitch to the first single crochet.
Row 2 Work 2 single crochets in each single crochet. Join with a slip stitch to the first single crochet. 12 sc
Row 3 Work 1 single crochet in the 1st single crochet. Work 2 single crochets in the next single crochet. Repeat to the end. Join with a slip stitch to the first single crochet. 18 sc
Row 4 Work 1 single crochet in each of the next 2 single crochets. Work 2 single crochets in the next single crochet. Repeat to the end. Join with a slip stitch to the first single crochet. 24 sc
Row 5 Work 1 single crochet in each of the next 3 single crochets. Work 2 single crochets in the next single crochet. Repeat to the end. Join with a slip stitch to the first single crochet. 30 sc
Row 6 Work 1 single crochet in each of the next 4 single crochets. Work 2 single crochets in the next single crochet. Repeat to the end. Join with a slip stitch to the first single crochet. 36 sc
Row 7-12 Work 1 single crochet in each single crochet around. Join with a slip stitch to the first single crochet. 36 sc
Row 13 Work 1 single crochet in each of the next 4 single crochets. Work 1 single crochet decrease in the next 2 single crochets. Repeat to the end. Join with a slip stitch to the first single crochet. 30 sc
Row 14 Work 1 single crochet in each of the next 3 single crochets. Work 1 single crochet decrease in the next 2 single crochets. Repeat to the end. Join with a slip stitch to the first single crochet. 24 sc
Row 15 Work 1 single crochet in each of the next 2 single crochets. Work 1 single crochet decrease in the next 2 single crochets. Repeat to the end. Join with a slip stitch to the first single crochet. 18 sc
Stuff the yarn clippings into the ball.
Row 16 Work 1 single crochet in the next single crochets. Work 1 single crochet decrease in the next 2 single crochets. Repeat to the end. Join with a slip stitch to the first single crochet. 12 sc
Row 17 Work 1 single crochet decrease in the next 2 single crochets. Repeat to the end. Join with a slip stitch to the first single crochet. 6 sc
Row 18 Fold remaining stitches in half. Slip Stitch across the 3 doubled stitches. Cut yarn. Tie in a knot and pull the tail into the ball.
To Felt: put the ball in your next load of dark colored towels. Wash and dry it on hot. Repeat to desired felted state. Remember, bright colors may probably bleed, so don’t do this with nice towels.

Subscribe to:
Posts (Atom)
